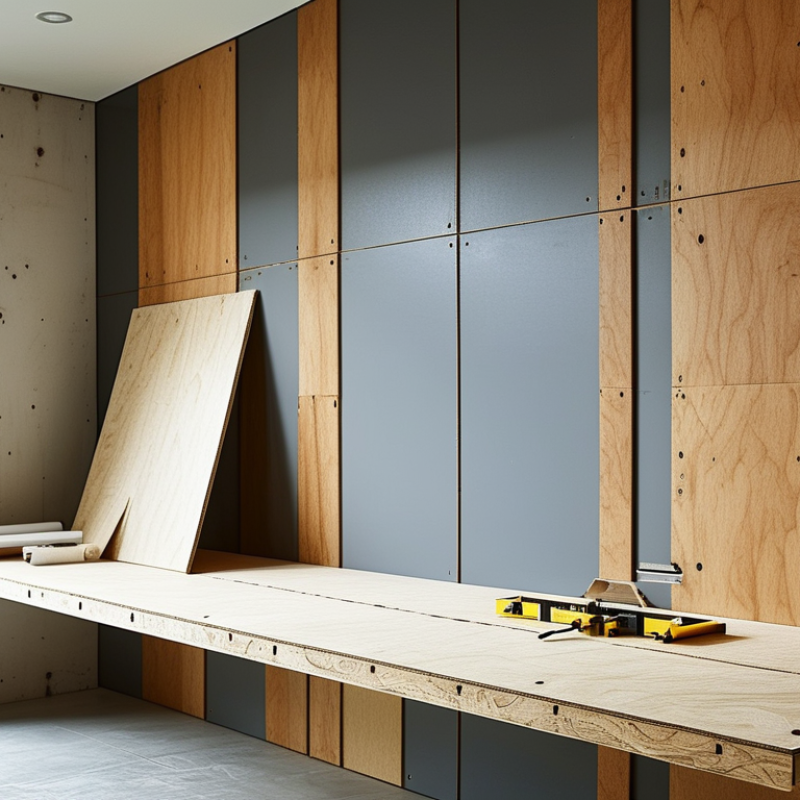
Installing plywood wall panels can transform a space, but it's crucial to do it right. Many DIY enthusiasts wonder how to install plywood wall panels correctly. This task may seem simple, but it requires careful preparation and attention to detail. Neglecting these elements can lead to issues such as uneven surfaces and poor adhesion.
Choosing the right materials is vital. Plywood thickness, adhesive type, and proper tools are essential for a successful installation. Without the correct equipment, even experienced hands may struggle. Moreover, before starting the project, measuring and planning can prevent costly mistakes later. Too often, people underestimate these steps and end up with panels that don’t fit as intended.
Ensuring a level surface is another key factor. An uneven wall can cause gaps and compromise the panel's appearance. Pay attention to how the panels align and how they’re secured. Reflecting on past projects can help identify mistakes. Recognizing what went wrong allows for better results next time. By taking the time to learn how to install plywood wall panels correctly, you can achieve a polished, professional look in your home.
Preparation Steps for Installing Plywood Wall Panels
When preparing to install plywood wall panels, the initial steps can greatly influence the success of your project. Always measure your walls carefully. According to the U.S. Forest Service, improperly measured panels can lead to excessive waste, accounting for nearly 15% of material costs. Thus, accuracy is critical.
Next, choose the right thickness for your panels. Research indicates that 5/8-inch plywood is often preferred for interior walls due to its balance of strength and weight. Additionally, ensure that your workspace is clean and free from dust. A clean environment reduces mistakes and improves adhesion during installation.
Don't forget to inspect your panels for defects. Even slight imperfections can impact the final look. Industry reports suggest that about 30% of installers overlook this crucial step. Mindfully choosing quality materials will pay off when you see the finished project. Reflect on your preparation process; it might require revisiting some steps to ensure everything is in order before you move on to installation.
Choosing the Right Plywood Type for Your Project
Choosing the right plywood type for your wall panel project is crucial. Various plywood types cater to different needs. For instance, hardwood plywood is known for its durability and aesthetic appeal. According to industry reports, it is often preferred for interior applications. Softwood plywood, on the other hand, offers lightweight and cost-effective options.
Consider the thickness of the plywood. Typical choices range from 1/4 inch to 3/4 inch. A thicker panel might provide better structural integrity. However, it can be cumbersome to handle. Assess your project's specific requirements carefully.
When installing plywood, ensure you have the right fasteners. Wood screws generally work well, as they offer solid grip. Pre-drilling holes can prevent splitting and enhance installation accuracy. For better results, always align the panels properly.
Lastly, proper finishing can significantly affect your project's longevity. Sealants protect against moisture and enhance aesthetics. Reports suggest that untreated plywood can warp or decay faster, so investing time in finishing is worthwhile.
Top 10 Tips for Correctly Installing Plywood Wall Panels
Essential Tools and Materials for Plywood Installation
Installing plywood wall panels can transform a space. To get started, gather essential tools and materials. A level is crucial to ensure your panels align perfectly. Use a stud finder to locate wall studs. It’s frustrating to miss them, leading to unstable panels.
You’ll need a circular saw for cutting plywood accurately. Safety goggles are vital to protect your eyes while cutting. A measuring tape can prevent costly errors. Don’t forget adhesive and appropriate fasteners. Choosing the wrong fasteners can weaken the structure, so double-check their compatibility.
While the process might seem simple, mistakes can happen. If the panels are not cut correctly, they won't fit right. Sometimes, the adhesive may not bond properly if the wall isn’t clean or dry. These details may seem small, but they can derail your project. Take time to plan and double-check every step.
Techniques for Properly Aligning and Securing Panels
When installing plywood wall panels, proper alignment and securing are crucial. Start by measuring your wall accurately. A level is essential for ensuring straight lines. Use a chalk line to mark guidelines on the wall. These steps may seem simple, but they are often overlooked. Misalignment can lead to gaps and an unprofessional look.
During installation, pay attention to panel seams. Align them to minimize visibility. Use wood adhesive on the back for added stability. While screws hold the panels in place, they need to be set slightly below the surface. This practice can prevent splintering and allow for smooth finishing. Over-tightening screws can damage the panels.
Another tip is to stagger the seams. This technique enhances strength and reduces the risk of cracking over time. Don't forget to regularly check your alignment as you work. Sometimes, misalignment occurs when you're deep in the process. Staying vigilant helps maintain quality. Remember, the details matter significantly in achieving a polished appearance.
Top 10 Tips for Correctly Installing Plywood Wall Panels
| Tip Number |
Tip Description |
Benefits |
| 1 |
Choose the Right Plywood |
Ensures durability and finish quality. |
| 2 |
Measure Twice, Cut Once |
Minimizes waste and errors in installation. |
| 3 |
Use a Level |
Guarantees that panels are aligned correctly. |
| 4 |
Choose the Right Fasteners |
Provides secure and stable panel attachment. |
| 5 |
Apply Adhesive for Extra Support |
Enhances stability and prevents warping. |
| 6 |
Leave Expansion Gaps |
Prevents buckling due to temperature changes. |
| 7 |
Secure Edges and Corners |
Improves overall panel integrity and appearance. |
| 8 |
Use Proper Tools |
Facilitates smoother and quicker installations. |
| 9 |
Follow Manufacturer's Instructions |
Ensures compliance with product specifications. |
| 10 |
Finish with a Smooth Sealant |
Enhances aesthetics and water resistance. |
Finishing Touches: Sealing and Painting Plywood Walls
When installing plywood wall panels, sealing and painting are crucial steps that enhance both appearance and durability. Studies show that plywood can absorb moisture, leading to warping or mold. Sealing the surface with a quality water-resistant sealant helps protect against these issues. The Commercial Plywood Association reports that properly sealed plywood can increase its lifespan by 20-30%.
The painting process also plays a vital role in the plywood's protective barrier. Acrylic latex paints are a popular choice due to their excellent adhesion and flexibility. Paint not only adds color but serves as an additional layer of moisture resistance. According to the Painting and Decorating Contractors of America, well-painted surfaces reduce maintenance costs by 15% over time. Don’t overlook the importance of a primer suitable for wood. This step can improve paint adhesion and prevent peeling, especially in high-humidity areas.
While the correct sealing and painting techniques can protect plywood, mistakes do happen. Inadequate prep work can lead to uneven surfaces, affecting aesthetics. Experts suggest allowing sufficient drying time between coats. Rushing this process may result in a patchy finish. It's essential to prioritize careful application to ensure lasting results.
Conclusion
In the article "Top 10 Tips for Correctly Installing Plywood Wall Panels," we delve into essential steps to ensure a successful installation. First, we emphasize the importance of preparation, which includes measuring the area and choosing the right plywood type suited for the project. Selecting appropriate materials and tools lays the groundwork for a smooth installation process.
Next, we discuss techniques for aligning and securing the panels to ensure a polished and stable finish. Finally, attention to detail during finishing touches, such as sealing and painting, is crucial for achieving the desired aesthetic and durability. By following these guidelines, you’ll learn how to install plywood wall panels correctly, enhancing your wall space effectively and efficiently.