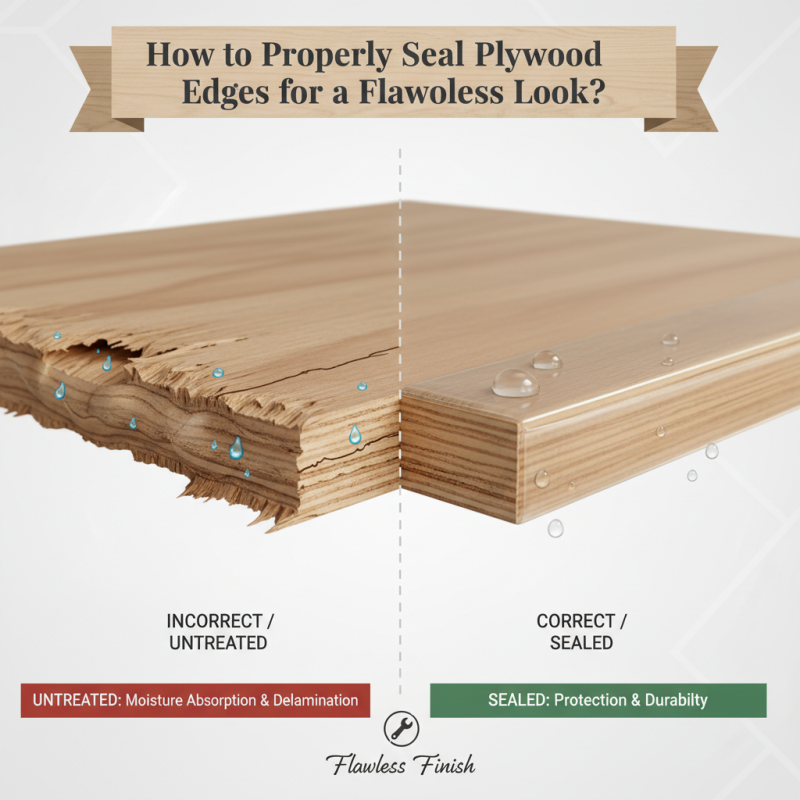
When it comes to woodworking, properly sealing plywood edges is often overlooked. Many enthusiasts and professionals alike may wonder how to seal plywood edges for a professional finish. The plywood industry reports that unfinished edges can absorb moisture, leading to swelling and potential damage over time. According to a study by the Forest Products Laboratory, untreated edges are also at risk of delamination.
Effective edge sealing is crucial for achieving aesthetic appeal. Poorly sealed edges not only ruin the look of a project but can also lead to costly repairs. For example, the National Wood Flooring Association highlights that proper sealing can extend the life of plywood by preventing damage from environmental factors. Despite this knowledge, some craftsmen still neglect this step, which can lead to regrettable results.
Understanding the best practices for sealing plywood edges can make a noticeable difference. Techniques such as using a high-quality sealant or applying multiple coats are essential. However, many find it challenging to achieve a flawless finish, realizing that achieving perfection requires patience and skill. Addressing these imperfections can result in a stunning final product that demonstrates true craftsmanship.
Choosing the right sealant for plywood edges is crucial for a professional finish. Many options exist, like polyurethane, epoxy, and acrylic sealants. Each has unique properties that affect durability and appearance. Polyurethane provides a strong, water-resistant seal. Epoxy offers superior adhesion but requires careful mixing. Acrylic is easy to apply but may not withstand moisture as well.
Consider your project’s environment. If your plywood will face humidity, opt for a more robust sealant, like polyurethane. Test a small area to see how the sealant behaves on your plywood. While achieving a flawless look is the goal, imperfections can occur. Uneven application or insufficient coverage can lead to issues later on.
Don’t rush the process. Allow adequate drying time and consider applying multiple coats. Reflect on your techniques to improve your skills. Over time, you’ll find the perfect combination for your projects. Mistakes are opportunities for growth in your craftsmanship.
Preparing the plywood surface is crucial for achieving a flawless look when sealing edges. Start by ensuring the plywood is clean and free of dust. A dust-free surface enhances adhesion when applying sealants. According to industry standards, a clean surface can increase the effectiveness of sealants by up to 30%. Use a soft cloth or vacuum to remove debris.
Next, consider sanding the edges lightly with fine-grit sandpaper. This step smooths any rough patches that could prevent proper sealing. Sanding increases the surface area, promoting better penetration of sealants. Aim for a consistent finish; uneven surfaces can lead to an unsightly outcome. Experts recommend sanding at least twice, checking for any imperfections after each round.
**Tips:** Always test your sealing method on a scrap piece of plywood first. This practice helps you avoid mistakes on your main project. If bubbles form while sealing, they indicate inadequate surface preparation. Addressing these issues early ensures a professional-looking finish.
Lastly, applying a primer can further enhance the sealing process. It provides an additional layer of protection against moisture and extends the life of your plywood. Remember, preparation is the key to achieving a quality result.
When sealing plywood edges, the application of sealant is crucial for a polished appearance. Proper techniques can dramatically enhance the appearance and durability of your project. According to industry reports, using a sealant can reduce moisture absorption by up to 70%, which benefits the longevity of plywood.
Start with surface preparation. Sand the edges smoothly to eliminate rough areas. This step increases sealant adhesion and achieves a seamless look. Next, choose a high-quality sealant designed for wood and apply it evenly with a brush or foam applicator. Aim for a thin layer to prevent drips or mess. Allow ample drying time; follow the manufacturer's guidelines for best results.
Tips: Test the sealant on a scrap piece first. This helps identify any issues and prevent unpredictable results. Don't rush the drying process; patience pays off.
Be aware that improper sealing might lead to peeling or cracking over time. Inspect your work regularly. If you notice any imperfections, consider sanding and reapplying the sealant. Achieving a flawless finish requires attention to detail and a willingness to refine your techniques continually.
When it comes to finishing plywood edges, the importance of sanding cannot be overstated. A smooth edge is essential for a polished appearance. According to the Woodworkers Guild of America, proper sanding reduces the chance of splintering. Start with a coarse grit sandpaper, around 80 grit, to shape the edge. Follow it up with finer grits, such as 120 and 220, for a silky-smooth feel.
Achieving a professional look also involves the right finishing agents. A study by the Forest Products Laboratory reveals that sealing adequately can enhance durability by up to 40%. Apply a sealant after sanding. Pay attention to the application method. Brush strokes can leave marks, so consider using a sprayer for an even finish. Multiple thin coats are better than one thick coat. Each layer provides more protection.
Some may rush through the process, but that often leads to disappointing results. Uneven sanding or inconsistent finishes can detract from your work. It’s crucial to revisit each step, ensuring uniformity in texture and color. Reflecting on common mistakes, such as neglecting edge sealing, can save time and resources in future projects.
Maintaining sealed plywood edges requires regular attention. Over time, seals can wear down. It's essential to inspect the edges every few months for any signs of damage or peeling. A simple visual check often reveals if the seal is still intact.
Reapplying sealant is not too difficult. Clean the edges first, ensuring they are free of dust and debris. Choose a suitable sealant that matches the initial application. Applying too much can lead to uneven surfaces, so a light coat is usually enough. Give it time to cure properly.
Environmental factors can also affect your sealed plywood. Humidity, heat, and exposure to sunlight can weaken the seal. Consider storing plywood in a controlled environment. Over time, you may realize that regular maintenance is crucial. Neglecting this task can lead to more significant issues down the line, like delamination or warping.
: The best sealant depends on your project. Polyurethane is water-resistant, while epoxy offers strong adhesion.
Start by sanding the edges smoothly. This enhances adhesion and gives a seamless look to your project.
Testing helps identify potential issues. It prevents unpredictable results on your main project.
Use a brush or foam applicator for even application. Aim for thin layers to avoid drips and mess.
Allow ample drying time. Following the manufacturer's guidelines results in better outcomes.
Rushing through sanding or applying thick sealants can lead to uneven results. Reflect on these errors for improvement.
Proper sanding reduces splintering and ensures a smooth surface, essential for a polished finish.
Multiple layers offer better protection and durability compared to one thick coat.
Improper sealing can result in peeling or cracking over time. Regular inspections help catch issues early.
Focus on uniformity in texture and color by revisiting each step carefully during the process.
Sealing plywood edges is essential for achieving a polished and professional finish in woodworking projects. To effectively learn how to seal plywood edges for a professional finish, one must start by choosing the right sealant, which ensures durability and a smooth appearance. Preparing the plywood surface is also critical; it should be clean and free of dust to allow for optimal adhesion.
When applying the sealant, utilizing techniques that promote a smooth application will enhance the overall look. Once the sealant has dried, sanding the edges will help achieve a refined finish. Finally, maintaining the sealed edges over time is crucial to preserve their appearance and prevent wear. By following these steps, anyone can confidently seal plywood edges and achieve a flawless result in their projects.
Regit Decor